Method 7
Assembling afghan with a Mattress Stitch or Ladder Stitch
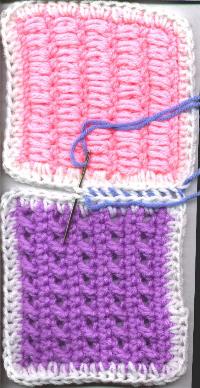
A: Sewn from the back (this causes a ridge to form on the front)(same as method #7, but sewn from the back)
Working with the wrong side of the squares up on a table, place the two squares together. With a yarn needle, and starting at one end of the square on the right, go BETWEEN the center the top and bottom loops of the first stitch and pull yarn through, now go to the first stitch on the left square, and go BETWEEN the center of the top and bottom loops of the stitch, pull yarn through.
Keep going back and forth between the two squares, weaving them together for four or five stitches,
then pull the yarn up, firmly, gently. Keep adding squares and weaving them together, until
you have added all your squares. You can also use this method to join thread crochet, such as tablecloths, bed spreads, etc when they are squares. I would like to thanks Jenny Seymour for her help.
This is a place for my knitting, sewing, crochet designs and projects. I have been knitting since I was 4, and crocheting since age 19 and I have starting weaving again, along with sewing. So this is where I will be posting those patterns too.
Showing posts with label How to assemble an afghan. Show all posts
Wednesday, December 17, 2014
Saturday, November 29, 2014
Method 6 Assembling the afghan
Method 6
Working with the right side of the squares up on a table, place the two squares together. With a crochet hook, make a band around the square.
Join the motifs together crocheting one row in a fancy stitch on one side of each motif, making sure to leave sufficient space between the motifs.
Keep adding squares and whipstitching them together, until you have added all your squares.
You can also use this method to join thread crochet, such as tablecloths, bedspeards, etc.
Method 4 How to assemble an afghan
Method 4
Assembling Afghan by crocheting it together
Working with the right side of the squares up on a table,
place the two squares together. With a crochet hook, take up
a loop from BOTH top and bottom loops of each square, and crochet
them together. Repeat across square, add two more squares,
crocheting these together, till you have the afghan, the
number of squares that you want it wide.
Go back and crochet the sides of each square together.
You now have completed two rows of your afghan.
Keep adding squares and crocheting them together, until
you have added all your squares.
Assembling Afghan by crocheting it together
Working with the right side of the squares up on a table,
place the two squares together. With a crochet hook, take up
a loop from BOTH top and bottom loops of each square, and crochet
them together. Repeat across square, add two more squares,
crocheting these together, till you have the afghan, the
number of squares that you want it wide.
Go back and crochet the sides of each square together.
You now have completed two rows of your afghan.
Keep adding squares and crocheting them together, until
you have added all your squares.
How to assemble an afghan #5
Method 5

Assembling the Afghan by crocheting it together
Working with the right side of the squares up on a table, place the two squares together. With a crochet hook, take up a loop from the bottom loop only of each square, and crochet them together. Repeat across square, add another square, crocheting these together, until you have the width of the afghan you want. Repeat for sides and rest of the squares.
Keep adding squares and crocheting them together, until you have added all your squares. This is my favorite way to put an afghan together, I like the "edge" you get by not using the top loops of each square, see the picture.
Assembling the Afghan by crocheting it together
Working with the right side of the squares up on a table, place the two squares together. With a crochet hook, take up a loop from the bottom loop only of each square, and crochet them together. Repeat across square, add another square, crocheting these together, until you have the width of the afghan you want. Repeat for sides and rest of the squares.
Keep adding squares and crocheting them together, until you have added all your squares. This is my favorite way to put an afghan together, I like the "edge" you get by not using the top loops of each square, see the picture.
Tuesday, November 20, 2012
Assembling the afghan
Method #3
It can also be done using embroidery stitches, I used on the sample a simple cross stitch, but you can use just about any one, try it and see for yourself. Just make sure you use both the top and bottom loops of each square. I'll post another picture with three stitches you can use, but if you have the book called 100 embroidery stithces, turn to page 17, and try these three, herringbone, double back stitch or closed herringbone stitch, and the chevron stitch, you could also try a simple blanket stitch.
Saturday, September 1, 2012
Assembling aghan by hand sewing it together
Method 2

Assembling aghan by hand sewing it together
Working with the right side of the squares up on a table,
place the two squares together. With yarn needle, take up
both top and bottom loops from the bottom edge of each square,
and whipstitch them together. Repeat across square, add
two more squares, whipstitching these together, till you
have the afghan, the number of squares that you want it wide.
Go back and whipstitch the sides of each square together.
You now have completed two rows of your afghan.
Keep adding squares and whipstitching them together, until
you have added all your squares.

Assembling aghan by hand sewing it together
Working with the right side of the squares up on a table,
place the two squares together. With yarn needle, take up
both top and bottom loops from the bottom edge of each square,
and whipstitch them together. Repeat across square, add
two more squares, whipstitching these together, till you
have the afghan, the number of squares that you want it wide.
Go back and whipstitch the sides of each square together.
You now have completed two rows of your afghan.
Keep adding squares and whipstitching them together, until
you have added all your squares.
Friday, August 10, 2012
Assembling Afghan Method 1
Assembling Afghans Method 1
In one of the group projects we did on the At My House Knitting and Crochet list was how to put an afghan together. I'll be posting the rest of the different ways to put one together here. Watch of it.

Assembling Afghan by hand sewing it together
Working with the right side of the squares up on a table, place the two squares together. With yarn needle, take up a loop from the bottom edge of each square, and whipstitch them together. Repeat across square, add two more squares, whipstitching these together, till you have the afghan, thenumber of squares that you want it wide.
Go back and whipstitch the sides of each square together. You now have completed two rows of your afghan.
Keep adding squares and whipstitching them together, untilyou have added all your squares.
In one of the group projects we did on the At My House Knitting and Crochet list was how to put an afghan together. I'll be posting the rest of the different ways to put one together here. Watch of it.
Assembling Afghan by hand sewing it together
Working with the right side of the squares up on a table, place the two squares together. With yarn needle, take up a loop from the bottom edge of each square, and whipstitch them together. Repeat across square, add two more squares, whipstitching these together, till you have the afghan, thenumber of squares that you want it wide.
Go back and whipstitch the sides of each square together. You now have completed two rows of your afghan.
Keep adding squares and whipstitching them together, untilyou have added all your squares.
Subscribe to:
Posts (Atom)
Another hat
Another hat finished, this time in Blue, Yellow and White, changed it a lot from the first one, and I really like this one much better. It...
-
Full and Fluffy Lacy Scrunchie @2001 by Cathy Hansen Use whatever yarn you like for this scrunchie, along with the appropriate hook...
-
Nina's Pineapple doily #1 @ 2010 by N. L. Banks There has been people emailing me asking for this pattern. It has been tested by my e...
-
Finished Doily This is the final doily that will be a pattern of the month in 2011 on my yahoo group. It's been tested by several peop...