Thursday, May 4, 2023

Tuck Stitch Vest Machine Knit


November 2013 Pattern of the month Machine knit

Tuck Stitch Vest 1984 by N. Banks


Beginner pattern

Pattern info: Cap sleeve with 1 inch mock rib at top and 2 inch mock ribbing at bottom.

About 26 inches long.  


Size: 40-42-44 one size fits all

Machine: SK 700, no ribber needed, has mock rib.

Gauge: 6 inch/13.5 rows to the inch

Tension: 10 for tuck, 7 for the ribbing.

Stitch Pattern: Tuck stitch #242A, or    Any that will give gauge.


Tension 7 RC 0. Cast on 138 stitches.  For mock hem, knit 27 rows.

RC 27:  transfer stitches to every other needle for picot hem. Leave empty needles in WP.

Ten 10:            knit 1 row.

Ten 7 RC O:   knit 27 rows, hang hem. With carriage on left, set tuck pattern.

Ten 10: RC 0: knit 189 rows. Cast on 6 stitches each side of carriage by e wrapping. RC 191.

Ten 10, RC 0: knit 121 rows. Stop tuck pattern, set to plain knitting here for hem.

Ten 7, RC 0:   knit 14 rows, transfer stitches to every other needle for picot hem. Leave empty needles in WP.

Ten 10:            knit 1 row.

Ten 7 RC 0:    knit 13 rows.

Ten 10 knit 1 row. Bind off around gate posts. Hand sew top hem down. Make two a like. Sew together at side seams under sleeve down to hem and across tops of sleeves leaving 10 to 12 inches across top open for head. You can also single crochet around the end of the sleeves and neck if you wish.

This pattern is copyrighted, and may not be used on any media, including websites, lists, newsletters, nor sold, recopied or reformatted. It is for your personal use only.

September 2020 Pattern of the Month Machine Knit


September 2020 Pattern of the Month Machine Knit

 Two Color Baby Vest

in two sizes with sleeve option

© 2015  by N Banks


This is a cute, quick, easy to make sleeveless vest with a sleeve option for a 6 month and 12 month baby. Made in two colors using 2 ply baby yarn that you can get just about any where. No hem is used, so a ribber is not required. The neckline and bottom just roll up. This pattern is written for beginners. Vest shown above is the 6 month size. The one below is shown in the 12 month size. Both are worked from the top up. Add the easy to make sleeves for a change for winter.

 Materials:

One ball or skein 2 ply baby yarn in solid and

One ball or skein in a variegated to match your solid color. Or make them in two solid colors.


If you make both sizes, then you will need two skeins of the variegated yarn. I used Red Heart Baby Yarn in Baby Print for the variegated and Pastel Green for the solid color. Samples were made on a SK700. 4.5 m machine.


1. Pull 88 (96) needles to working position.

            6 mo.                        12 mo.

            88  Stitches              96 stitches.

            44 – 0- 44                48 – 0- 48


2. Starting on the 2nd needle on the left, push back every other needle to non working

    position. 

  3.  Cast on with e-wrap, and variegated yarn. Set machine to basic knit. 

4. Ten 4, RC 0: Knit 

             6 rows               6 rows

     Don't forget to hang your weights and move them up.


5. COR. Pull all needles to working position.


6. Ten 4, with solid yarn, RC 0,    knit 

            10 rows            10 rows.


7. Attach variegated, cut solid yarn. Move           

     your weights up.


8. Ten 6. RC 0,    knit

            50 rows             58 rows.

 Place a yarn marker at each end of knitting.


 9. Ten 6 RC 0, COR, knit

           44 rows             52 rows.


10. Change to solid. Ten 4.0  COR.

   Starting on the 2nd needle on the left,  push back every other needle to non working position. You will have two  needles at the end on the right side in working position..


11. Knit 14 rows both sizes.


12. Ten 4, RC 0, Change to variegated and knit 4 rows. Bind off.


13. Make two alike. The top is the smaller, shorter solid trim. With right sides to-

      gether, sew from the bottom up to the yarn markers, these are the arm hole

      openings. If you are making it with the sleeves, do not crochet around them.


14. For shoulder seams, with main color sew  across the top beginning at the outside

      shoulder for two inches from the shoulder,  leaving the center open for the head.


15. Starting at underarms, with main color, single crochet around arm hole edges, then

      single crochet around neck and bottom of vest.


                    Arm hole edge

Sleeves

1. Pull 64 (66) needles to working position.

            6 mo.                        12 mo.

            72  Stitches              76 stitches.

            36 – 0- 36                38 – 0- 38


Starting on the 2nd needle on the left, push back every other needle to non working position. See Diagram at 2 above.


2. Cast on with e-wrap, and variegated yarn. Set machine to basic knit. See

   diagram at 3 above.


3. Ten 4, RC 0: Knit 

             6 rows               6 rows

     Don't forget to hang your weights and move them up.


4. COR. Pull all needles to working position.


5. Ten 4, with solid yarn, RC 0,    knit 

            10 rows            10 rows.


6. Ten 6. RC 0,    knit

            78 rows             92 rows.


7. Bind off, make two alike.


Finishing:

1. Fold sleeve in half, and at the top, mark the center with a pin. With right sides facing,

    pin the center of sleeve to the center at the shoulder, pin sleeve to armhole opening.


2. Pin sides together at opening, under sleeves. See picture below.


3. Sew seams together, then sew the sleeve to  the cuff together.


  This pattern is copyrighted, and may not be used on any media, including websites, lists, newsletters, nor sold, recopied or reformatted without permission. It is for your personal use only.


November 2020 Pattern of the Month Machine Knit


At My House


November 2020 Pattern of the Month Machine Knit


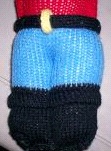
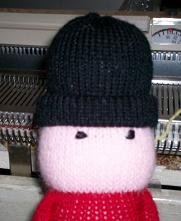
Machine Knit 12” Toy Soldier Nutcracker

©2015 by N Banks


Quick, simple, easy to knit toy soldier nut-cracker. It has no shaping, so it is suited for a beginner.  The sample was knit on a Studio SK 700 4.5 machine.


Materials:

3/11 or 2/11 yarn small amounts of

Black, Pale Pink, Blue and Yellow

3 yards or less of Lion Brand Fun Fur in color 304 Strips Night Sky

Yarn needle and a shape yarn needle.

1. With black, and leaving a long tail, cast on with e-wrap 54  ( 27 – 0- 27 ). Set machine

    to plain knit.  Ten 10 RC 0, knit 20 rows.

2. Run a yarn marker in this last row.


3. Ten. 10, RC 0, knit 10 rows. Hang hem on the marked row. Knit 1 row. Fasten off

   black.

4. Ten 10, RC 0 with Blue knit 20 rows. Fasten off blue.

5. Ten 10, RC 0 with red, knit 26 rows.   Fasten off red.

6. Ten 10, RC 0, with pale pink, knit 16 rows. Fasten off pale pink. 

7. Ten 10, RC 0, with black, knit 20 rows. Hang hem to first row of black.  

8.  Ten 10, RC 0, knit 20 rows.

9.  Move 2 end stitches both sides of knitting to next to 2 needles ( 50 stitches). Leave 4

     needles out of work.

10. Ten 10, RC 0, knit 5 rows. Bind off, leaving a long tail.


         11.  With knit side in, sew top of hat closed, sew sides of hat closed, sewing inside the hat brim first, then the out side.


12. With pale pink, sew head closed. With red, sew chest closed. With Blue, sew legs

     closed. With Black, sew first inside, then outside of boot cuff, then rest of boots.


13. Turn right side out. Stuff hat firmly, then stuff rest of body firm. Center seam at

     back, sew bottom of boots closed.

14. With black sew center of boots and cuff to up to the pants (blue). Sew with blue the

      pants about half up. 

15. With red, at waist, run red at line just  above the blue and pull up a bit. With red

     at top of shirt, run red and pull up tight to shape head.

16. Starting about ½ down from top of shirt at right side of doll, sew arms and hand.


17. Belt. With black, leaving a long tail, cast on with e-wrap 8 stitches ( 4 – 0 – 4 ).

      Ten 10. knit 70 rows. Bind off. Set aside.

18. Buckle. With yellow, cast on with e-wrap 4 stitches ( 2 – 0- 2) knit 14 rows. Bind off,

     leaving a tail. With knit sides facing, sew seam closed. Turn right side out, and slip

     on belt, center at middle of belt.

19. Put belt on doll with buckle centered in front, and sew seam at back closed.


20. Eyes, with black sew over 2 stitches with 3 times placing eye as per picture. Repeat

     for second eye. 

21. Nose, with pale pink, thread yarn needle with four strands of yarn. Sew nose four  

      rows under eyes centered on 3 center  stitches. Sew three times.  

22. Ears. At sides of head about ¼ inch from bottom of hat brim, sew with four strands,

      3 times.  


23. Beard: Thread yarn needle with about a yard and half of the long eyelash yarn.  Start ½ inch above the shoulder below the ear, and taking tiny stitches using every  two knit stitches across the lower part of the face working to-wards the other ear.   Work in an up side down C shape and pull the eyelashes out of the stitches as you work up  towards just under the nose. I used the yarn needle to pull the lashes  out of the stitches, then brushed the beard with it.  Hope you enjoy this pattern as much as I did making it.

This pattern is copyrighted, and may not be used on any media, including websites, lists, newsletters, nor sold, recopied or reformatted without permission. It is for your personal use only.


Friday, April 28, 2023

Windmill Wings S-894 Doily September 2018 Pattern of the Month Crochet


Windmill Wings S-894 Doily
September 2018 Pattern of the Month Crochet


 measures 17 inches in diameter
from Coats % Clark's ONT Book No. 324 10 cents


J & P. COATS BIG BALL BEST SIX CORD MERCERIZED CROCHET, Art. A.l04, Size 30: 2 balls of Ecru, or

CLARK'S BIG BALL MERCERIZED CROCHET, Art. B.34, Size 30: 2 balls of No. 61 Ecru.
Milwards Steel Crochet Hook No. 10.

A size 20 or 30 thread for the size 10 hook, or size 10 thread for a size 7 hook.

Starting at center, ch 8. Join with sl st to form ring.

Rd 1: Ch 3, 15 dc in ring. Join with sl st to top of ch-3 (16 dc, counting ch 3 as 1 dc).

Rd 2: Ch 1, sc in same place as sl st, * ch 3, skip 1 dc, sc in next sc. Repeat from *  around. Join (8 loops).

Rd 3: Sl st in next loop, ch 3, 5 dc in same loop, 6 dc in each loop around. Join.

Rd 4: Ch 3, dc in same place as sl st (an inc) *dc in next 2 dc, 2 dc in next dc. Repeat from *  around. Join (64 dc).

Rd 5: Ch 8, * skip 3 dc, dc in next dc, ch 5. Repeat from * around. Join with sl st to 3rd ch of ch-8 (16 sps).

Rd 6: Ch 3, 6 dc in same place as sl st, *  sc in next loop, ch 5, sc in next loop, 7 dc in next dc. Repeat from *  around, ending with sc in last loop. Join, turn; sl st in last sc, turn.

Rd 7: Ch 3, 3 dc in same place as last sl st, * ch 5, 4 dc in next sc. Repeat from *  around. Join.

Rd 8 : Ch 3, holding back on hook the last loop of each dc, make dc in next 3 dc, thread over and draw through all loops on hook (cluster made), *  ch 5, dc in next ch-5 sp, ch 5, 4-dc cluster over next 4 dc. Repeat from * around. Join last ch-5 to tip of cluster.

Rd 9 : Sc in next loop, *  7 dc in next dc, sc in next loop, ch 5, sc in next loop. Repeat from *  around. Join last ch-5 to first sc.

Rd 10 : Sl st to center dc of  7 -dc group, ch 5, dc in same place as last sl st, *  ch 5, in next loop make dc, ch 2 and dc; ch 5, in center dc of next 7-dc group make dc, ch 2 and dc. Repeat from * around. Join.

Rds 11 to 13: Sl st in ch-2 sp, ch 5, dc in same sp, *  ch 5, in next ch-2 sp make dc, ch 2 and dc. Repeat from *  around. Join last ch 5 to 3rd ch of ch-5.

Rd 14: Sl st in next ch-2 sp, ch 3, * 7 dc in next loop, dc in next ch-2 sp, ch 5, in next ch-2 sp make dc, ch 2 and dc; ch 5, dc in next ch-2 sp. Repeat from* around. Join.

Rds 15 to 26th  incl: Ch 3, dc in same place as sl st, *  dc in each dc
across dc group, 2 dc in last dc; ch 5, in ch-2 sp make dc, ch 2 and dc; ch 5, 2 dc in first dc of next dc group. Repeat from * around. Join (33 dc in each dc group on 26th rnd).

Rd 27: Sc in same place as sl st, draw loop on hook out to measure 1/4 inch, insert hook between double and single loops and make an sc (knot st made), make another knot st, * (skip 3 dc, sc in next dc, make 2 knot sts) 7 times, sc in last dc; make 2 knot sts,) sc in center ch of ch-5, 2 knot sts, sc in ch-2 sp, 2 knot sts, sc in center ch of next ch-5, 2 knot sts, sc in first dc of next dc-group, 2 knot sts. Repeat from * around, ending with 2 knot sts.

Rds 28 to 33 incl: *  Insert hook under double loop to right of next knot and draw loop through, insert hook under double loop to left of same knot and draw loop through, thread over and draw through all loops on hook, make 2 knot sts. Repeat from * around (132 loops in each rnd), ending last rnd with sc in center of next knot.

Rd 34: * Ch 5, sc in center of next knot. Repeat from *  around. Join.

Rd 35: *  In next loop make 2 sc, ch 3, sl st in last sc (picot) and 2 sc; 6 dc in center ch of next loop. Repeat from * around. Join and break off. Starch lightly and press.


Another hat

  Another hat finished, this time in Blue, Yellow and White, changed it a lot from the first one, and I really like this one much better. It...